
By Jessica Jacobs
Contributing Writer
Hydrangeas, known for their stunning, colorful blooms, are a favorite among gardeners seeking to enhance their outdoor spaces. While you can grow hydrangeas from seeds or purchase them as young plants, propagating them from stem cuttings is a rewarding, cost-effective way to expand your garden. This method not only saves money but also allows you to replicate your favorite varieties. Here’s a detailed guide to help you master this propagation technique.
Step 1: Choose the Right Timing
Timing is crucial when propagating hydrangeas. Late spring to early summer (May to June) is the ideal window because plants are actively growing, and young, flexible stems are more likely to root successfully.
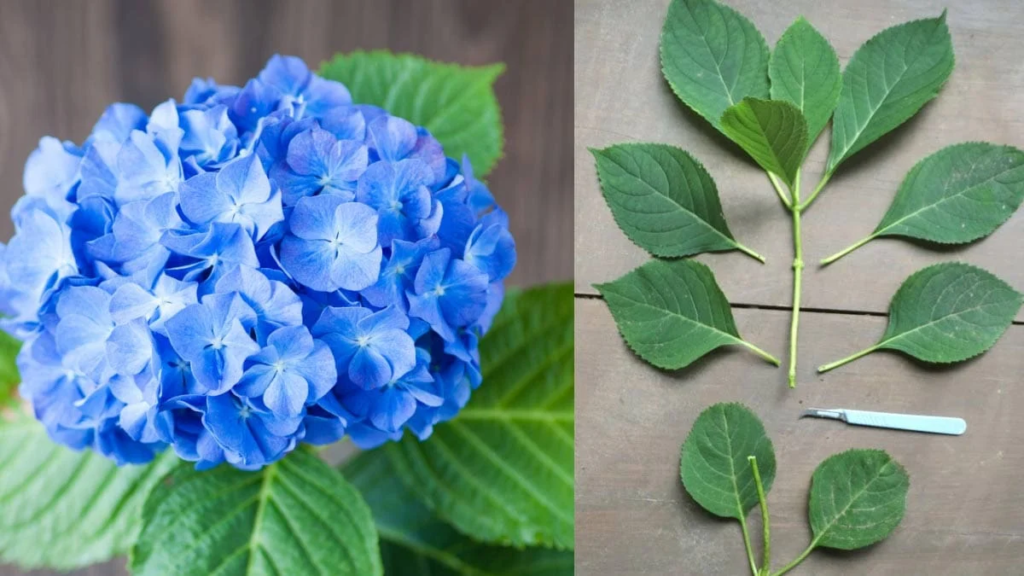
Step 2: Select and Prepare Healthy Stems
Identify healthy stems that are pencil-thick, disease-free, and have not yet flowered or are just beginning to form buds. These stems will focus their energy on root development.
Using clean, sharp pruning shears, cut a 4 to 6-inch section just below a leaf node (the point where a leaf connects to the stem). Make the cut at a 45-degree angle to maximize the surface area for root growth. If the cutting is longer than needed, trim it just above another node to minimize leaf bulk and reduce water loss.
Step 3: Prepare the Cuttings
Strip the lower half of the cutting of its leaves, leaving only a few at the top. This reduces the risk of fungal infections and focuses the plant’s energy on rooting.
Step 4: Apply Rooting Hormone (Optional)
For better results, dip the cut end of each stem in powdered or gel-based rooting hormone. These products contain auxins, natural plant hormones that encourage root growth. Follow the manufacturer’s guidelines for proper application.
Step 5: Prepare the Rooting Medium
Use a well-draining, soilless mix like a blend of peat moss and perlite. This combination ensures the perfect balance of moisture and aeration. Fill a small container with the mixture, water thoroughly, and let excess water drain before planting.
Step 6: Plant the Cuttings
Make small holes in the rooting medium and insert the cuttings so that at least one leaf node is below the surface. Gently press the medium around the base to secure the stem. If planting multiple cuttings in one container, leave space between them for air circulation.
Step 7: Create a Humid Environment
Place the container in bright, indirect light and cover it with a clear plastic bag or propagation dome to create a mini-greenhouse effect. This retains moisture and promotes high humidity, essential for rooting. Avoid direct sunlight, which may scorch the cuttings.
Step 8: Water and Monitor
Maintain even soil moisture, ensuring it’s damp but not waterlogged. Check the cuttings regularly for signs of stress or disease. Remove any unhealthy ones to protect the others.
Step 9: Transplant Rooted Cuttings
After 8–12 weeks, your cuttings should have developed roots. Gently transplant them into individual pots with well-draining potting mix or directly into your garden. Handle the delicate roots with care to prevent damage.
Step 10: Nurture Young Plants
Water regularly, especially during hot weather, and mulch around the base to conserve moisture. Position your hydrangeas in partial shade to shield them from harsh sunlight. Monitor for pests and diseases, addressing any issues promptly.
Step 11: Practice Patience
Propagation takes time and persistence. Not every cutting will root, but with experience, your success rate will improve. Celebrate each new hydrangea you grow and enjoy the vibrant beauty they bring to your garden for years to come.
By following these steps, you’ll gain the skills to propagate hydrangeas effectively, creating a lush, colorful garden filled with these timeless blooms.