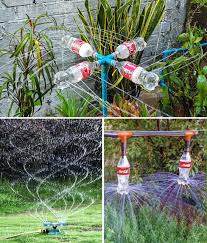
Looking for an eco-friendly and cost-effective way to keep your garden well-watered? This guide will show you how to make an efficient rotating irrigation sprinkler using plastic bottles and a mechanical bearing for enhanced performance. By integrating simple materials with an innovative design, you can create a durable sprinkler that evenly distributes water across your garden.
Materials You’ll Need
- Two 0.5-liter plastic bottles
- PVC ‘T’ connector (with a diameter slightly smaller than the bottle openings)
- Larger PVC pipe (sized to house the mechanical bearing)
- Smaller PVC pipe (to serve as the rotating axis)
- Mechanical bearing (fits snugly on the smaller PVC pipe)
- PVC glue
- Waterproof sealant or rubber seals
- Drill or sharp tool (for making holes)
Step-by-Step Instructions
1. Prepare the PVC ‘T’ Connector
- Slightly heat the PVC ‘T’ connector until it becomes pliable.
- Carefully insert the necks of the two plastic bottles into the connector ends, ensuring a snug fit. Avoid overheating to prevent damaging the PVC.
2. Modify the Plastic Bottles
- Drill small holes on the top side of each bottle for water spray.
- Create a hole near the base of each bottle, ensuring they are on opposite sides for balanced rotation. These holes allow water pressure to drive the spinning action.
3. Construct the Rotating Mechanism
- Fit the Mechanical Bearing: Insert the bearing into one end of the larger PVC pipe and secure it with PVC glue. Ensure the bearing is centered for smooth movement.
- Insert the Rotating Axis: Slide the smaller PVC pipe through the bearing. This will act as the central axis of rotation.
- Seal the Assembly: Apply waterproof sealant or fit rubber seals at the points where the smaller pipe exits the larger pipe to prevent water leakage while allowing smooth rotation.
4. Assemble the Sprinkler
- Connect the garden hose to the lower end of the smaller PVC pipe, which will serve as both the water supply and the vertical support.
- Attach the PVC ‘T’ connector with the bottles to the top end of the smaller PVC pipe. Make sure the assembly is secure and balanced to enable smooth spinning.
- Fix the larger PVC pipe with the bearing to a stable base so that only the smaller pipe and bottles rotate.

Testing and Adjustments
- Turn on the water and observe the sprinkler in action.
- Adjust the water flow to optimize rotation speed and spray coverage.
- Make sure the holes in the bottles are evenly spaced to ensure balanced spinning and consistent water distribution.
Pro Tips for Success
- Use a mechanical bearing designed to withstand water exposure for improved durability.
- Test the rotation mechanism before sealing the assembly to ensure smooth operation.
- Consider painting or weatherproofing the PVC parts to protect your sprinkler from the elements and extend its lifespan.
This upgraded rotating irrigation sprinkler design combines resourcefulness with functionality. By incorporating a mechanical bearing, you’ll achieve smoother operation and longer-lasting performance. Not only is this project a great way to repurpose materials, but it also creates a practical tool to help your garden thrive.
Start building your sprinkler today and enjoy the rewards of a greener, well-irrigated garden!