Growing mushrooms in plastic bags is an efficient and practical method that allows for consistent daily harvests. This guide breaks down the process into clear steps, ensuring you can cultivate mushrooms successfully with minimal resources.
Step 1: Prepare the Lime Water Mixture
Creating a proper lime water mixture is essential to prepare the substrate for mushroom growth.
- Mix 200 grams of lime powder with 30 liters of water in a large container.
- Stir thoroughly to ensure the lime is evenly dissolved.
Step 2: Prepare and Incubate the Substrate
Preparing the Substrate:
- Submerge straw or hay in the lime water mixture. This material will act as the growing medium.
- Allow the substrate to soak for about 30 minutes.
- Drain the excess liquid thoroughly to prevent waterlogging.
Incubation Process:
- Place the drained straw or hay in a pile and cover it with plastic sheeting.
- Maintain a consistent temperature of 65–70°C for approximately 4 days. This step helps sterilize the substrate and encourages microbial balance necessary for mushroom growth.
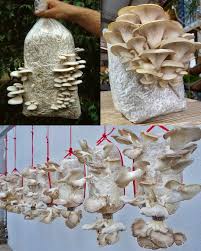
Step 3: Mushroom Cultivation in Plastic Bags
Using Plastic Bags:
- Select polyethylene (PE) bags with dimensions of approximately 30 x 40 cm. A folded square bottom is ideal for layering the substrate.
- Clean the bags thoroughly to ensure they’re sterile and free from contaminants.
Layering the Substrate:
- Add a 3–4 cm layer of the prepared substrate at the bottom of the bag.
- Sprinkle mushroom spawn (seeds) along the inner wall of the bag.
- Continue layering with 6–7 cm of substrate, adding mushroom spawn to each layer, until you have four layers. Ensure the top layer is sprinkled evenly with spawn.
Sealing and Placement:
- Seal the bag’s opening with clean cotton to prevent contamination.
- Secure the opening and transfer the bags to a fiber nursery.
- Space the bags apart, cover the tops with damp newspaper, and maintain a moist and warm environment.
Step 4: Manage Growth and Harvest
Environmental Management:
- Keep the nursery area closed to retain moisture and warmth, which are crucial for mushroom development.
- Observe the bags daily. Once the mycelium (white fungal growth) has fully covered the substrate, proceed to the next step.
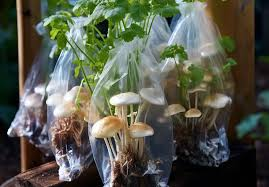
Cutting and Hanging:
- Cut the plastic bags and hang them in a clean area.
- Make small incisions in the bags to allow mushrooms to sprout.
Watering and Harvesting:
- Water the bags 2–3 times daily to maintain consistent moisture levels.
- When mushrooms are ready, harvest them by twisting them counterclockwise. Avoid pulling to prevent damage to future crops.
- After harvesting, pause watering briefly to encourage the next flush of mushrooms.
Step 5: Ensure Consistent Harvests
- Repeat the watering and harvesting process as new mushrooms grow.
- Subsequent generations often yield more mushrooms, so consistent care will maximize your harvest.
Why This Method Works
This plastic bag method is:
- Adaptable: Suitable for small spaces and can be scaled to meet your needs.
- Efficient: Utilizes readily available materials and allows for frequent harvests.
- Sustainable: With proper environmental conditions and monitoring, you can enjoy continuous mushroom production with minimal effort.
By following these steps and maintaining consistent care, you can cultivate fresh mushrooms every day, providing a sustainable and rewarding way to grow your own food.