Bean sprouts are a versatile and nutritious ingredient that can elevate the taste and texture of salads, stir-fries, sandwiches, and more. While you can purchase them from the store, growing bean sprouts at home using plastic bottles is a fun, cost-effective, and rewarding process. With just a few simple materials and steps, you can enjoy fresh, crunchy sprouts right from your kitchen.
Materials You’ll Need
- Green beans (mung beans are ideal for sprouting)
- Warm water
- Three large plastic bottles (at least 5 liters each)
- A smaller bottle (to act as a funnel for seed distribution)
- A drill or sharp object (to create holes in bottle caps)
- Towels (to create a dark, humid environment)
- A knife or scissors (to cut the bottles as needed)
Step-by-Step Guide
1. Prepare the Beans
Start by placing the green beans in a bowl. Rinse them thoroughly to remove any impurities. Once cleaned, pour warm water into the bowl, ensuring the beans are fully submerged. Gently mix them to ensure even hydration. Let the beans soak for about 4 hours. This process activates the sprouting process by hydrating the beans and softening their outer shells.
2. Prepare the Bottles
While the beans are soaking, prepare the plastic bottles. Take the three large bottles and create ventilation holes in their caps. Use a drill or a sharp object to make small holes in the caps, which will allow for air circulation—a vital element for sprout growth. Proper ventilation helps prevent mold and encourages healthy sprouting.

3. Distribute the Beans
After soaking for 4 hours, the beans are ready to be transferred to the bottles. Cut off the top portion of the smaller bottle to create a makeshift funnel. Use this funnel to pour the soaked beans into the three large bottles. Distribute the beans evenly across the bottles to allow for optimal growth space. Each bottle should have enough room for the sprouts to expand.
4. Cover the Bottles
Once the beans are inside, screw the caps (with holes) back onto the bottles. To create the ideal sprouting environment, cover the bottles with damp towels. The towels maintain a dark, humid environment, essential for sprout growth. Slightly moisten the towels if necessary by spraying them with water.
5. Water and Drain the Sprouts
Over the next four days, you’ll need to nurture your growing sprouts. Water them three times a day to maintain moisture. To do this, pour water into the bottles and let it soak for about 5 minutes. Then, turn the bottles upside down to drain out excess water. This draining step is critical because stagnant water can cause mold or rot. After each watering, re-cover the bottles with the damp towels to maintain the ideal growing conditions.
6. Harvest Your Fresh Sprouts
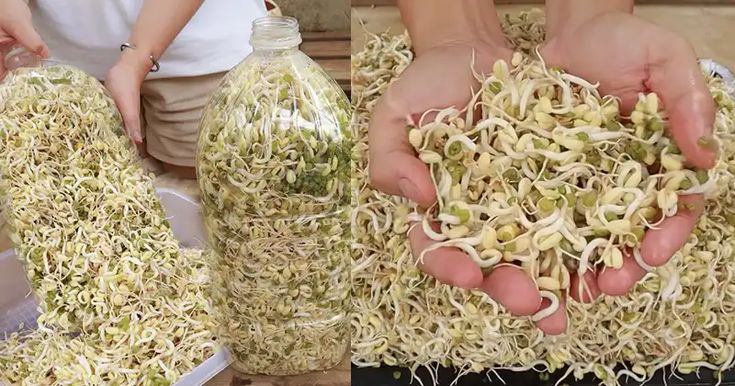
By day four, your bottles will be filled with plump, white bean sprouts ready for harvest. Carefully cut open the bottles using scissors or a knife. Take your time to avoid damaging the sprouts. Once removed, rinse the sprouts thoroughly to eliminate any remaining seed casings or residue. Your homegrown sprouts are now ready to be added to your favorite dishes for a fresh, crunchy boost of flavor and nutrition.
Final Thoughts
Growing bean sprouts at home using plastic bottles is a simple, cost-effective way to ensure a fresh supply of this nutrient-packed ingredient. The process requires minimal effort but delivers maximum satisfaction. With patience, proper hydration, and a bit of care, you’ll have plump, fresh sprouts ready to enhance your meals. Enjoy the satisfaction of growing your own healthy food and the unbeatable taste of freshness in every bite. Happy sprouting!