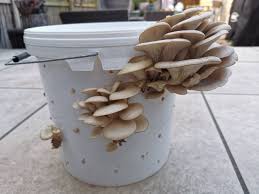
Growing mushrooms at home is a rewarding and sustainable way to enjoy fresh, nutritious fungi right from your own space. Among the various methods available, using buckets with holes offers a straightforward and efficient approach for cultivating mushrooms. This step-by-step guide will help you grow mushrooms successfully, allowing you to harvest multiple times throughout the year.
Materials Needed:
- Straw (wheat or oat)
- Water
- Large pot for boiling
- Mushroom spawn (seeds)
- Plastic buckets with holes
- Clean cloth or lid for covering
- Watering can or spray bottle
- A cool, dark space for incubation
Step 1: Prepare the Straw
Choose straw from wheat or oats as it’s ideal for mushroom cultivation. Chop the straw into 2-4 inch pieces to create an ideal environment for the mushrooms.
Step 2: Boil the Straw
Place the chopped straw in a large pot and cover it with water. Bring the water to a boil and allow it to simmer for 10-15 minutes to sterilize the straw. Once boiled, let the straw cool to room temperature to avoid harming the mushroom spawn.
Step 3: Obtain Mushroom Spawn
Purchase mushroom spawn from a reliable supplier. Depending on your preference, you can choose different types of mushrooms such as oyster, shiitake, or white button mushrooms. These varieties are well-suited for home cultivation.

Step 4: Layer Straw and Mushroom Spawn
Fill your plastic bucket with holes, starting with a layer of cooled straw at the bottom. Sprinkle mushroom spawn evenly over the straw, then add another layer of straw. Continue layering until the bucket is nearly full, ensuring the spawn is evenly distributed. Finish with a layer of straw on top.
Step 5: Incubate the Bucket
Cover the bucket with a clean cloth or a lid with small holes to allow airflow while maintaining a dark environment. Place the bucket in a cool area with temperatures between 70°F and 75°F (21°C to 24°C). Over time, the mushroom mycelium (root system) will colonize the straw, which typically takes around 2-3 weeks.
Step 6: Daily Watering
To keep the mycelium healthy, ensure the straw remains moist. Water the substrate once or twice a day using a watering can or spray bottle. Be careful not to overwater, as excess moisture can lead to contamination or mold growth.
Step 7: Harvesting Mushrooms
After about 21 days, tiny mushroom pins will begin to appear on the surface of the straw. These will gradually grow into mature mushrooms. Harvest the mushrooms by gently twisting and pulling them when they reach the desired size, typically after a week or two of pinning. Always pick them before they release spores to avoid affecting future crops.
Step 8: Ongoing Harvesting
For continued harvests, keep picking mushrooms before they drop spores. This helps maintain optimal conditions for the next round of growth, ensuring multiple harvests from the same bucket.
Important Considerations:
- Contamination Control: Proper sterilization is key to preventing contamination. Ensure all materials, such as straw and equipment, are properly sanitized.
- Safety: Handle mushrooms with care, and if you’re unsure about any aspect of cultivation or consumption, consult with local experts or mycologists.
Conclusion:
Growing mushrooms at home in buckets is an easy and satisfying way to enjoy a steady supply of fresh mushrooms. By following this guide, you can grow your own mushrooms, experiment with different species, and enhance your culinary creations. Happy mushroom growing!
