By Holly Owens, Contributing Writer
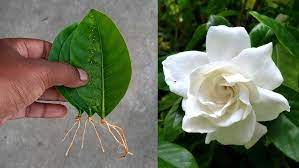
Gardenias are cherished for their elegant white blooms and captivating fragrance. Propagating gardenias from cuttings is not only an economical way to expand your collection but also a deeply rewarding experience that allows you to nurture new plants from start to finish. This guide provides a straightforward, step-by-step process to help gardeners of all levels successfully propagate these stunning plants.
Why Propagate Gardenias?
Propagating gardenias allows you to grow new plants identical to the parent, ensuring consistent quality in blooms and fragrance. It’s a perfect way to share plants with loved ones or enhance your garden with minimal cost.
What You’ll Need
Before starting, gather these essential materials to ensure a smooth process:
- Garden shears or sharp scissors: For clean, precise cuts.
- Rooting hormone (powder or gel): To boost root growth.
- Small pots with drainage holes: To prevent waterlogging.
- High-quality potting mix: A well-draining mix ideal for propagation.
- Clear plastic bags or a propagation dome: To maintain humidity.
Step 1: Choose the Right Time
Timing is key. Take cuttings during late spring or early summer when gardenias are actively growing. This period offers optimal conditions for root development.
Step 2: Select a Healthy Mother Plant
Start with a robust, disease-free gardenia plant. Look for vibrant leaves and sturdy stems, avoiding any plant with signs of pests or damage. Healthy parent plants give cuttings the best chance to thrive.
Step 3: Take the Cuttings
Using sharp garden shears or scissors, cut a 4–6-inch stem just below a node (where leaves meet the stem). Ensure each cutting includes at least two sets of leaves. A clean, angled cut promotes better rooting.

Step 4: Prepare the Cuttings
Carefully remove the leaves from the lower half of the cutting to reduce moisture loss and encourage root formation. Dip the cut end into rooting hormone, which increases the likelihood of successful rooting.
Step 5: Plant the Cuttings
Fill your pots with well-draining potting mix. Create a small hole in the center and insert the cutting, ensuring the lower node is slightly buried. Firm the soil gently around the stem and water lightly to settle it.
Step 6: Create a Humid Environment
To retain moisture, cover each pot with a clear plastic bag or place it under a propagation dome. This high-humidity environment mimics the natural conditions needed for rooting.
Step 7: Provide Proper Care
Place the pots in a bright location with indirect sunlight. Keep the soil consistently moist but not soggy. Check for signs of rooting after 4–6 weeks by gently tugging on the cuttings; resistance indicates root development.
Step 8: Transplanting
Once roots are established, gradually acclimate the new plants to outdoor conditions. Transplant them into larger pots or directly into your garden, ensuring they receive plenty of light and well-drained soil.
By following these steps, you’ll enjoy the satisfaction of successfully propagating gardenias and enriching your garden with their timeless beauty. With patience and care, your efforts will reward you with a thriving collection of these iconic plants.
Happy gardening!
This version enhances clarity, adds informative details, and leaves readers feeling well-prepared and confident to take on the task of propagating gardenias.
