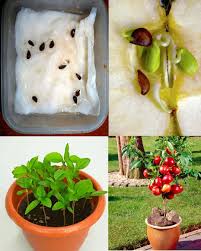
Did you know that you can grow an apple sapling from the scraps of an apple, in just 10 days, and without spending any money? In this guide, we’ll show you how to turn your apple leftovers into a thriving plant, all while learning about the simple, yet fascinating process of growing from seed.
The Hidden Potential of Apple Scraps
Apples are often celebrated for their health benefits. They are hydrating, low in calories, and contribute to a feeling of fullness, making them a great option for those on a weight-loss diet. But beyond their nutritional value, apples can also be a source of new life. In the seeds inside each apple lies the potential to grow a whole new tree.
While growing a full apple tree from seed takes patience, it’s an incredibly rewarding experience. In this guide, we’ll show you how to transform the core and seeds, which would usually be thrown away, into a flourishing sapling. This simple process requires minimal effort and can be done with common household items.
Step-by-Step Guide to Growing an Apple Sapling
1. Extracting the Seeds
The first step in growing your own apple sapling is to extract seeds from a ripe apple. Choose a mature apple, cut it carefully so that you don’t damage the seeds inside, and remove them. You only need one or two seeds, but feel free to extract a few more to increase your chances of successful germination.
2. Germination Process: Waiting for New Life
Once you have your seeds, it’s time to start the germination process. Here’s what you need to do:
- Find a small plastic or glass container with an airtight lid.
- Line the container with a damp cloth napkin and place the seeds on top of the cloth.
- Lightly mist the seeds with water using a spray bottle, making sure the cloth is moist but not soaked.
- Seal the container and place it in a spot with indirect sunlight for about 10 days. Keep the container in a warm area, but avoid direct sunlight.
Check the seeds regularly to ensure they’re not drying out or developing mold. After 10 days, open the container to see if the seeds have sprouted. If some seeds remain ungerminated, you can leave them for a little longer.

3. Planting the Germinated Seeds
Once the seeds have started to germinate, it’s time to plant them. You’ll need:
- A 10 cm diameter pot.
- Peat soil or well-draining universal soil.
- A spray bottle for watering.
Make a hole in the soil about 3–4 cm deep. Gently place the germinated seed into the hole, ensuring the root faces downward and the seed is positioned upwards. Cover the seed with soil and lightly mist the surface with water to keep it moist.
Place the pot in a well-lit area, but avoid direct sunlight to prevent the young seedling from overheating.
4. Nurturing Your Sapling
After planting, you’ll begin to notice growth. In about a week, your seedling should have sprouted to around 4 cm in height. As the weeks go by, the plant will continue to grow. Within a month, small leaves will begin to appear. Be patient, as the plant will need several months to mature.
Once your sapling has grown over 1 meter tall and the trunk reaches around 1 cm in diameter, it will be ready for grafting, which is an essential step if you want to cultivate a fruit-bearing apple tree.
Conclusion
Growing an apple sapling from scraps is not only an enjoyable and educational activity but also a cost-free way to watch nature unfold before your eyes. With just a few simple steps, a little patience, and some care, you can transform an apple’s discarded core into a thriving plant, all in the comfort of your own home. Happy planting!
