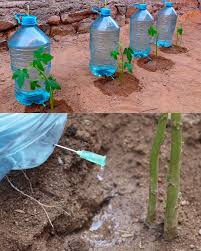
Gardening enthusiasts often seek ways to care for their plants in an eco-friendly and cost-effective manner, while minimizing water waste. In this article, we will explore two simple yet highly effective methods for watering plants using everyday household items. These techniques will help you conserve water, reduce costs, and keep your plants healthy without the need for expensive equipment.
Method 1: Slow-Release Watering Using a Buried Plastic Bottle
This method involves using a plastic bottle to slowly release water directly to the plant’s root zone. It’s ideal for outdoor plants, especially vegetable gardens, where efficient water usage is essential.
Materials Needed:
- A large plastic bottle (2-liter works best)
- Marker
- Sharp tool (e.g., awl or heated iron rod)
- Water

Step-by-Step Guide:
- Prepare the Bottle: Clean the plastic bottle and remove any labels. Using a marker, draw two lines on the bottle: one about 15 centimeters from the bottom and the other about 10 centimeters from the neck.
- Create the Water Outlet: Make a small hole approximately 7 centimeters from the bottom of the bottle.
- Fill the Bottle: Fill the bottle with water up to the lower line and screw the cap back on.
- Bury the Bottle: Dig a hole near the plant’s base and bury the bottle, ensuring that the hole is facing the plant. The top line should be level with the soil surface.
- Final Step: Fill the bottle completely with water, close the cap, and cover it with soil, leaving the neck exposed.
Advantages:
- Efficient Water Delivery: Water is delivered slowly and directly to the plant’s root zone, reducing evaporation.
- Time and Resource Saving: This method reduces the frequency of watering, saving both time and water.
- Perfect for Outdoor Gardens: Ideal for vegetable gardens and other outdoor plants, especially during dry spells.
Method 2: Wicking System with a Plastic Bottle and Fabric/String
The wicking system uses a cotton fabric or string to draw water from the bottle and deliver it directly to the plant’s roots, ensuring consistent moisture.
Materials Needed:
- Plastic bottle
- Cotton fabric or thick cotton string
- Water
- Sharp tool for making a hole
Step-by-Step Guide:
- Prepare the Bottle: Clean the bottle and make a hole in the cap that’s large enough for the fabric or string to pass through.
- Thread the Fabric/String: Cut a piece of fabric or string long enough to reach the soil and thread it through the hole in the cap.
- Fill and Seal: Fill the bottle with water, place the fabric or string through the cap, and ensure it is fully saturated with water.
- Position the Bottle: Place the bottle cap-side down in the soil near the plant, with the fabric or string extending into the soil.
Advantages:
- Consistent Moisture: The wicking action ensures a steady supply of water directly to the roots, maintaining optimal soil moisture.
- Ideal for Potted Plants: This method works well for both indoor and outdoor potted plants, offering low maintenance and easy monitoring.
- Self-Sustaining: Once set up, it requires minimal attention, making it ideal for busy gardeners or those on vacation.
Conclusion
Both of these DIY watering methods offer sustainable, low-cost solutions to keep your plants healthy, even during dry periods or when you’re away. Using simple materials like plastic bottles and fabric, these techniques not only save water but also help conserve resources and reduce your environmental footprint.
By incorporating these eco-friendly watering methods into your gardening routine, you can ensure your plants stay hydrated and thriving without the need for expensive or water-intensive systems. Whether you have a vegetable garden, potted plants, or a mix of both, these techniques provide a cost-effective way to keep your plants flourishing, all while promoting water conservation and environmental sustainability.
