Aloe Vera is a versatile plant prized for its medicinal and cosmetic benefits. While Aloe Vera is most commonly propagated through pups (small offshoots), it is also possible to grow a new plant from leaf cuttings. Although this method is more challenging and takes patience, it is a rewarding way to expand your Aloe Vera collection. Below, we explore several effective methods for propagating Aloe Vera from leaf cuttings.
Method 1: Rooting Aloe Vera in Soil
Step 1: Cutting the Leaf
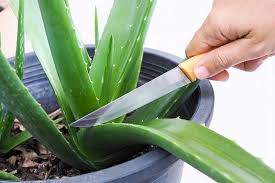
Start by selecting a healthy, mature leaf from an established Aloe Vera plant. Using a clean, sharp knife, cut the leaf at a slight angle near its base. Choose a leaf that is thick and fleshy, as it’s more likely to root successfully.
Step 2: Drying the Cutting
Let the cut end of the Aloe Vera leaf dry and form a callous. Place the leaf in a warm, dry location for several days (up to a week). This step helps prevent rot when the leaf is planted in soil.
Step 3: Preparing the Soil
Fill a small pot with a well-draining potting mix, such as cactus soil, which is ideal for Aloe Vera. Ensure the pot has drainage holes to avoid waterlogging, which can lead to root rot.
Step 4: Planting the Cutting
Insert the calloused end of the leaf into the soil, about 1-2 inches deep. Avoid watering immediately after planting.
Step 5: Watering
Wait about a week before lightly watering the soil. Keep it barely moist, as overwatering can cause the cutting to rot. Watering too early can prevent root development.
Step 6: Waiting for Roots
Be patient. It can take anywhere from a few weeks to a couple of months for roots to develop. During this period, ensure the plant receives indirect sunlight and stays in a warm environment.

Method 2: Water Propagation
Step 1: Preparing the Cutting
Follow the same initial steps as in Method 1 to prepare the Aloe Vera leaf cutting and allow it to callous.
Step 2: Using Water
Place the cut end of the Aloe leaf into a small jar filled with water. Cover the jar with cling film and poke a few holes in it to secure the leaf in place. The water should only cover the very end of the leaf, keeping the rest of the leaf dry.
Step 3: Changing the Water
Change the water every few days to prevent bacterial growth. This method allows you to monitor the development of roots over time.
Step 4: Planting
Once roots are visible and have developed sufficiently, transfer the cutting into a pot with well-draining soil.
Method 3: Bag Propagation
Step 1: Preparing the Leaf
After cutting and callousing the Aloe leaf, lightly moisten it with water.
Step 2: Bagging the Leaf
Place the moistened leaf inside a clear plastic bag with small holes for air circulation. Seal the bag to create a greenhouse effect, providing warmth and humidity to encourage root growth.
Step 3: Checking Progress
Store the bag in a warm, bright area with indirect light. Periodically check for root development. Once roots form, plant the cutting in a well-draining potting mix.
Method 4: Aloe Gel Application
Step 1: Preparing the Cutting
Follow the same process as the previous methods to cut and callous the Aloe leaf.
Step 2: Using Aloe Gel
Extract fresh Aloe Vera gel from another mature leaf. Apply the gel to the calloused end of the cutting. Aloe gel contains natural hormones that may help stimulate root growth.
Step 3: Planting
Plant the cutting in well-draining soil and follow the same care instructions as in Method 1.
Final Thoughts
Propagating Aloe Vera from leaf cuttings can be a slow process, but it’s a gratifying one with the right care and patience. While success rates are generally higher when using pups, these methods provide alternative ways to grow new Aloe Vera plants. Be sure to create a stable environment with adequate warmth and moisture to encourage rooting, and remember that Aloe Vera cuttings can take several weeks or even months to establish roots. With time, you’ll enjoy nurturing your new plants into healthy, thriving Aloe Vera specimens.
