Introduction:
Celery is not just a crunchy addition to your favorite recipes; it’s also a vegetable that can be easily regrown from scraps right in the comfort of your own home. Whether you have a green thumb or not, regrowing celery is a simple and rewarding process that requires minimal effort and resources. In this guide, we’ll take you through the step-by-step process of regrowing celery first in water and then transplanting it into soil, all within containers.
Section 1: Materials Needed
To successfully regrow celery at home, you’ll need the following materials:
- Fresh Celery: Purchase a bunch of celery from your local grocery store or farmer’s market. Look for one with healthy, crisp stalks.
- Containers: Use containers with drainage holes for both the water and soil stages. Options include glass jars, plastic containers, or recycled vessels that can hold water.
- Water: Use clean, room-temperature water for the initial regrowth stage.
- Potting Mix: Opt for a well-draining potting mix for the soil stage.
- Sunlight: Find a sunny spot in your home where the celery can receive adequate sunlight.
Section 2: Step-by-Step Instructions
Step 1: Harvesting and Preparing Celery Scraps
- Cut the Celery: Trim the celery stalks, leaving about 2 inches from the base. This is where the regrowth will occur.
- Remove Outer Layers: Peel away any outer layers that may hinder the regrowth process.

Step 2: Water Regrowth
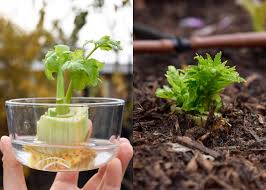
- Place in Water: Submerge the celery base in a container with enough water to cover the cut end.
- Change Water Regularly: Change the water every few days to keep it clean and provide essential nutrients.
- Wait for Growth: After a week or two, you should start seeing new leaves emerging from the center of the celery base.
Step 3: Transplanting to Soil
- Prepare Container: Fill a container with well-draining potting mix, leaving enough space for the celery base.
- Plant the Celery: Gently transfer the celery base from water to soil, burying it just enough to cover the roots.
- Water and Sunlight: Water the soil and place the container in a sunny location. Celery thrives in sunlight, so ensure it gets at least 6 hours a day.
- Maintain Moisture: Keep the soil consistently moist but not waterlogged. Celery prefers slightly damp conditions.
Step 4: Care and Harvest
- Fertilize (Optional): If desired, you can use a balanced fertilizer to promote healthy growth. Follow the package instructions.
- Monitor Growth: Watch as your celery plant grows and develops. You can expect to harvest outer stalks once they reach a reasonable size.
- Continuous Harvesting: Celery is a cut-and-come-again plant. Harvest outer stalks as needed, allowing the inner ones to continue growing.
Section 3: Conclusion
By following these simple steps, you can enjoy the satisfaction of regrowing celery at home, even if you don’t have a garden. It’s a sustainable and cost-effective way to have fresh celery on hand whenever you need it. Start your regrowing journey today and experience the joy of harvesting fresh, homegrown celery. Happy regrowing!
